things i love friday. letterpress.

Now that summer is here it means more time to do all the other things I love, and more time to blog!  So, I decided it was time to introduce a new monthly feature: things i love friday - where I can share all the other non-craft/non-baking things I love.  First up is letterpress, something I have become incredibly enamoured with over the past few years.  It's my goal to finally be able to take a letterpress class in the fall.
top left: storybook invitation. bottom left: ribbons invitation. top right: amidst routes print. bottom right: critters card set.  All images copyright of Pearl & Marmalade.
One of the few letterpressed cards I own is from Pearl & Marmalade.  It's a happy birthday card with a hedgehodge drifting from a hot air balloon and I refuse to actually give it to anyone.  P&M is the lovely creation of Dani & Lee, friends and designers who create the most beautiful, whimsical letterpress cards, invitations and prints.  You can check them out here, http://www.pearlmarmalade.com/index.php?page=about-us.  My favourite is the "amidst routes" print, I think I may be ordering that soon.
top left: root vegetables boxed note set. bottom left: happy birthday flower border card. top right: windmill thank you card. bottom right: you are so sweet! card. All images copyright of Dutch Door Press.
I am luck enough to also own a card from Dutch Door Press, that turquoise Happy Birthday one in fact!  Based out of the main floor of a Victorian San Francisco home, Dutch Door is run by Mara and Anna, letterpress printers/illustrators who teamed up in 2006.  They have a range of cards, totes, notebooks and wedding invitations.  Look at more of the loveliness here http://www.dutchdoorpress.com/.  The root vegetable card set is one of my favourites, I think I have a particular friend who may be getting that for her birthday!
top left: beard styles postcard. top left: el corazon loteria print. right: lady on horse postcard.  All images copyright Hammerpress .
Unfortunately I do not yet own any of these lovely prints by Kansas City-based Hammerpress.  They have a rather large selection of cards, prints, posters, shirts, postcards and calendars that can be purchased on their site.  I love the Victorian-esque/ retro/ quirky illustrations..their style varies between prints.  See more here http://hammerpress.net/.

Thanks for letting me share my first "things i love" feature.  Happy weekend! xo.

d.i.y. citrus scrub.

What could be better on a cloudy afternoon than something fresh and citrusy?

This was a fun little project that me and a lovely friend whipped up in her kitchen this weekend. It smells amazing and is super easy to make, most, if not all of the ingredients are probably already in your kitchen cupboards!
I think it would also make a really sweet gift in a jar with some pretty paper on top - this is Amy Butler paper, my most favourite fabric designer!
citrus salt scrub. adapted from adelyn stone - although I should note that neither Sara or I are very into measuring things, so our amounts are slightly different.

1 C. sea salt.
1/4 C. oil - vegetable, canola, olive, etc.
1 tbsp. lemon juice.
zest of half a lemon.
a little bit of orange zest - but only if you like.

mix the salt and oil together in a bowl. mix in lemon juice and zest and you're done! package in a mason jar with some pretty paper and you are all set for soft, summery skin.

makes 1 cup. I already tested some on my hands this morning and they are super soft and smell wonderful!  xo.

lemon blueberry whole wheat scones.

And we have more cloudy days. Not my particular favourite, but nothing a little tea and scones can't fix!  I love everything about tea parties, getting to use my vintage dishes from England, the teapots, the wonderfully patterned, thrifted tableclothes. the dessert, everything.

This recipe is based on one from my childhood.  Yes, I was that child that was raised on scones and forced all of her friends into tea parties at a very early age.  Usually we make plain scones, or add cheddar cheese, but today I decided that I wanted something lighter and more summery.  Blueberries with lemon is one of my favourite flavour combinations!
lemon blueberry whole wheat scones.

1 1/2 C. whole wheat flour.
1 C. unbleached flour.
1/4 C. sugar.
3 tsp. baking powder.
1/2 C. cold butter cut into cubes.
1 egg.
2/3 C. milk.
zest and juice of one lemon.
1/4 C. blueberries, plus more for putting on top.

Preheat oven to 400 degrees. Mix the flours, baking powder and sugar together. In a seperate bowl lightly beat egg and add milk.  Cut in butter into dry ingredients and then add wet ingredients. Add zest and lemon juice and fold in blueberries.  Shape dough into 8 balls and place on a baking sheet.  Flatten into disks roughly 1/2" thick, making a small dent in the centre of each.  Place a spoonful of berries in the centre of each scone and sprinkle a little bit of sugar on top.  Bake for 15 minutes, or until bottoms are golden brown.  Serve with tea, lemon curd, devonshire cream or maybe just a little bit of butter! Makes 8.
My goal this summer is to go on a lot of tea parties/picnics, so hopefully this is just the beginning! Happy Happy Monday! xo.

d.i.y. fringe necklace.

Remember when I told you how much I love fringe? Well, now I made it into a necklace and I'm liking it.

The general inspiration for this came from one of my friends for had this amazing giant fringe necklace at folk fest last summer, I think hers was thread, it was awesome and I have secretly envied it all year.  Now I have my own.  I feel it's an appropriate amount of fringe for everyday, like not just for brief moments when I'm feeling extra hippie-ish. 


Things you need:

_vinyl
_template [I drew mine based off of a 5" square, the angled point starts 3" down on either side and ends in the middle - 2.5"]
_chain
_jump rings and clasp
_jewelry pliers [ needle nose, snips, and the flat ones that I can't remember the name for]
_rotary cutter
_ruler and cutting mat


1_cut out a piece of vinyl with your template.
2_ cut out two more pieces of vinyl, shortening the template by 1"each time.  It helps to measure them all on the template to begin with, cut the first piece, cut down the template, cut next piece, etc.
3_using your rotary cutter and ruler fringe each piece by cutting small strips, stopping 1/2" before the end.  It doesn't matter if they're an even width or completely straight, it moves around and the layers mix together once you're done!
4_pin all layers together, aligning the top edge.
5_stitch. you could use either a machine or hand stitch,.
6_attach jump rings to either end.  I trimmed down the back two edges and only put the ring through the front (shortest) piece.  I used a push pin to make the holes, it took a bit of poking to get the opened jump ring through.
7_decide how long you want your necklace to be my measuring the chain around your neck, then subtract the length of the fringed piece. cut in half and slip one end onto each opened jump ring, then close.  Attach the clasp to one end using a jump ring.
8_you're all done!

Have a lovely day! I've had the best time enjoying the sunshine, biking around and making pretty things! And May isn't even over yet! xo.

swiss muesli.


This is what I thought about all day at work yesterday - swiss muesli.  These are the odd things that distract me on quiet, cloudy days at work. I'm pretty sure this is also all I talked about when I went out for dinner afterwards.  When I get excited about something I will pretty much talk about it non-stop, blindly assuming that everyone else around me is equally intrigued by new breakfast foods.

Although I have to admit that when I first skimmed through this recipe before I left for work I may have thought it was something entirely different... ie. something where you cooked down all the fruit and then let sit with the  rolled oats and THEN ate with yogurt the next morning.  Sounds amazing, now you know why I thought about it all day. 

But then, upon actually reading the recipe when I got home I got slightly frightened - there was no cooking involved.  Instead you mixed everything together WITH the yoghurt and left it in your fridge overnight.  It sounded kind of like mushy, cold oatmeal, not incredibly delicious. but I had thought/obsessed about it all day so I decided I was making it. And it was going to taste good.

I ate it this morning for breakfast.  It was delicious.  Life lesson: make it, even if it terrifies you slightly.


Swiss Muesli. modified slightly from Miss Dahl's Voluptous Delights by Sophie Dahl - my most favourite cookbook.

[her original recipe used apples and raspberries - but I have a random allergy to apples so I switched it to pears and blackberries, it was delicious, but I would also recommend trying the apple version.]

2 pears, grated.
the juice of half a lemon.
1 C. rolled oats.
1 C. plain yoghurt.
1/4 C. blackberries.
1/4 C. chopped nuts - I used pecans, she used walnuts.

grate the pears and pour the lemon juice over top.  Mix everything together.  Place in a jar and leave in your fridge overnight.

Eat the next morning with more yoghurt and berries in your sun porch.  yum!

Apparently this makes one serving...but I feel this is more like 3, so this will cover a few breakfasts and snacks!

Have a lovely day. xo.

summer fruit cobbler.


This summery recipe was in my most recent Martha Stewart Living and it was the perfect dessert for a warm summery evening.  Luckily we still had blueberries and raspberries in the freezer from last summer, otherwise you might want to wait until midsummer, when you can actually go pick raspberries again.  Something I am very very excited for this summer!

Martha - because clearly she baked this herself - only used raspberries, but I like it mixed with blueberries, way less tart and overwhelming.


fruit cobbler, slightly adapted from Martha Stewart

Filling.
5 C. berries - any kind really.
1/4 C. sugar.
2 tbsp. cornstarch.

Biscuit topping.
1 C. whole wheat flour.
3/4 C. unbleached flour.
1 3/4 tsp. baking powder.
1/4 C. sugar.
6 tbsp. cold butter cut into pieces.
3/4 C. milk.

Make the filling: Preheat oven to 375 degrees. (325 degrees if using glass.) Mix together berries, granulated sugar and cornstarch. Pour into a 9-inch square baking dish (or like whatever dish you have that is smaller than a 9x13").
Make the biscuit topping: Whisk together flour, baking powder and granulated sugar. Cut in butter until largest pieces are the size of small peas. Add milk, and use a fork to incorporate, stirring just until cream is absorbed (there should be lots of loose pieces).
Turn out dough onto a clean surface, and knead once or twice, gathering loose bits into ball. Pat dough to a 1 1/4-inch thickness. Cut into 9 rough squares, and place them on top of filling. Brush with milk, and sprinkle with sugar.
Bake cobbler until bubbling in center and biscuit topping is golden brown and cooked through, about 1 hour.  Let stand at least 30 minutes before serving.

I should note that that that is what the pan looked like the next morning, so clearly this is delicious and you should make it.

Have a lovely week. xo.

mint juleps.


Yay the first sunny weekend off! (yesterday doesn't count because I worked.)  Today finally felt like summer and it was wonderful, being outside was so warm and there was nothing particular on my list to do, except drink mint juleps.

I have had a love of mint juleps since high school.  When we read the Great Gatsby, which was my favourite book that we read in English class since it wasn't Jane Austen or a Elizabethan play.  All the glamour and drama and scandal and intrigue of the 30's , with it's odd characters and beautiful descriptions.  And they drank mint juleps.  I had no idea what a mint julep was when I first read it, except that it sounded delicious and vintage.  It was during the part when  Tom finds out that Gatsby is in love with Daisy and Jordan and Nick are awkwardly caught in the middle of it and it all explodes on a very hot day in a hotel room.  This is shortly before they all heatedly drive off and Daisy hits Myrtle Wilson (who is having a affair with Tom) by mistake with her car and George Wilson freaks out and kills Gatsby because he thinks Gatsby did it....I didn't ruin it, you need to read it, it's the best.

How can you NOT want a mint julep after all of that?  I should also note I never actually drank a mint julep until today.  Somehow it took four years of thinking about it to make that happen.

They lived up to their expectations, although they kind of look like swamp water/you are drinking an herb garden.  They are also rather strong because they are pure alcohol....more of a leisurely sipping drink.  Also my new favourite summer drink, I love mint!


Mint Juleps.

4 mint leaves torn into small pieces (I just picked out my new summer mint plant, mint juleps/mint extract/ mint everything all summer long, yay!)

1/2 teaspoon powdered sugar

2 teaspoons water

2.5 oz bourbon (which, if you are like me and don't happen to own a shot glass but instead have a large number of measuring cups, equals 1/4 C. plus a little splash)


In a small glass muddle/smash mint leaves, water and sugar.  (These are the glasses my mum convinced me were "juice glasses." Clearly they are meant for drinks made out of pure alcohol that look ridiculous in normal glasses.) Add ice and pour in bourbon. Welcome to the 1930's.  Enjoy on your front porch in the sunshine.

Have a lovely Victoria day! xo.

ps. listen to this.  I like it.

d.i.y: a little book.


Yay more crafts!  So, over the past few months I've been seeing a ton of d.i.y's for "Art Journals," which confused me. When I generally think of art I think of empty sketchbook + a lot of pencils = drawings, not little pieces of paper, photos and random quotes glued into a book.  Like, what's the point?  You put little pictures in a book of things that are pretty and then you draw random things on top them? Is it a scrapbook? I don't know.  I still don't understand.

However, what I do understand is the need for a sketchbook to draw and write random thoughts in.  For the last four years I've had a sketchbook constantly attached to me while I figure out school projects and eventually it became a way to sort out and organize everything else in my life.

And now I miss it. It's been less than a month since school ended but I already feel lost without that part of my life....Cue an entire paragraph about how lost and confused I feel, which is entirely unrelated to this D.I.Y and can be entirely skipped...

So school is done, like actually totally done, and I feel super out of it.  I've been in school since I was two.  I only know how to function on a predetermined schedule, where I know exactly what I need to do to get things done and do well.  I'm comfortable with that environment and being surrounded by a large group of people.  And all those years of school have been leading to this and it feels.....anti-climatic.  My entire life I just assumed you went to school, then university, graduated and then automatically got to join the field that you just finished studying for.  Apparently not.  I know we've been done for less than a month, and I have a job that I enjoy, but it's not in my field. And I've dropped off a ton of applications, and nothing has come up and I can't shake this terrible feeling that this is it, that now that I'm left on my own, it's not going to go anywhere, that it's possible that I could never get a job in a firm and completely fail.  It is the worst possible feeling.  So this is going to be a year of a lot of learning, getting used to a completely different environment...and a lot of applications and phone calls.  Everything has always worked out, and I feel this will too, just not in the timing that I would like...

Anywaaays....back to craft therapy.  I like sketchbooks, and I don't like empty things.  I like looking at pictures and textures and writing things out to get inspiration.  Therefore, this book is the best sketchbook + everything I love all together, and it fits in my bag.


Things you need:
_paper ( I tore some pages out of a half finished sketchbook)
_thin cardboard (like a cereal box, or if you're a nerd, millboard)
_ruler, exacto and gluestick
_tape (I used masking tape, but I've seen other people use painter's tape or Washi tape)
_things to decorate with, like fabric, pretty paper, pictures from magazines, pieces of things you like, pens etc.)


1_ cut your paper down to whatever size you like, I did 4" by 5.5".  Cut two covers out of your cardboard, making them slightly bigger.

2_with the "nice" side of the cardboard facing up place a piece of tape along the long edge with half hanging off.  Flip over so sticky side of tape is up.

3_place one piece of paper on top of tape.

4_flip over and trim tape.  Your first page is done!  To keep adding pages turn the page and follow the previous steps.

5_attach the back cover and your book is assembled!

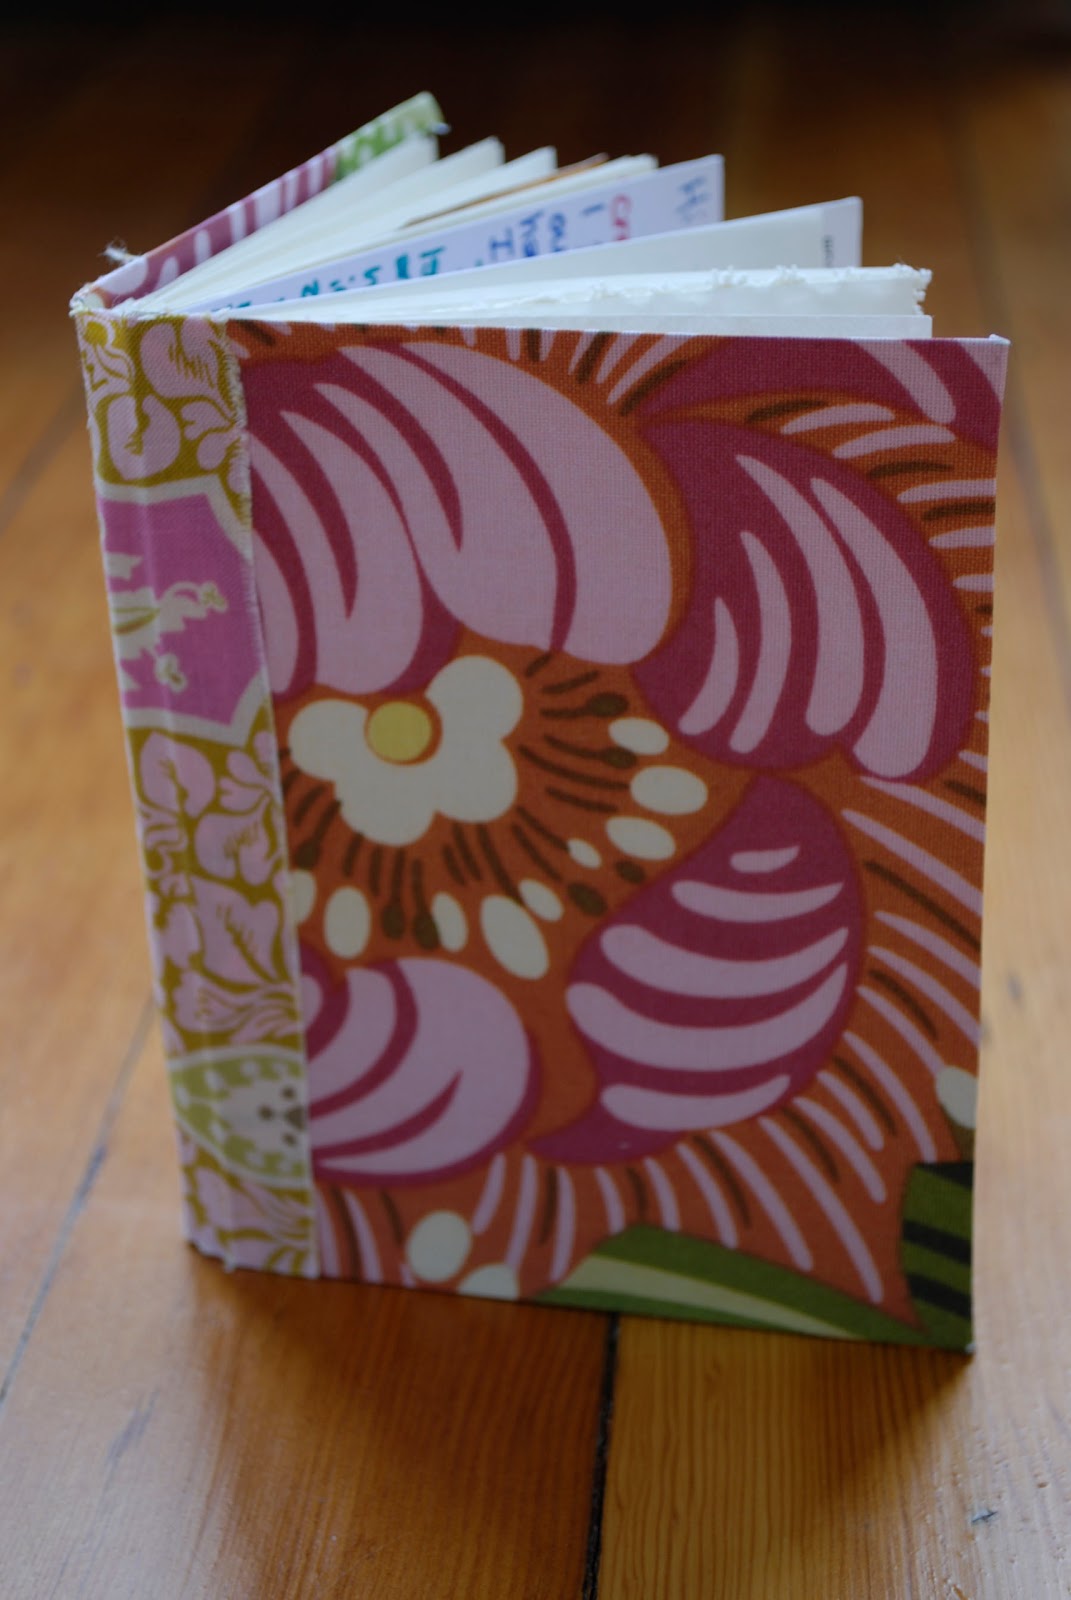
6_make your book lovely.  I added pretty paper to the front and back and covered the binding with a strip of fabric.

7_add fun things to the inside.


I hope you have a lovely weekend doing lots of creative things! xo.

life lately.

It's been an odd, but lovely time being done school, a lot of free time which honestly makes me a bit nervous.  So, the past few weeks have been filled with lots of little things to keep me distracted.  New Pantone lipstick (so awesome, if you are able to comprehend the immensity of Pantone's wonderfulness,) lots of baking, dates with my favourite kids, adventures to the greenhouse, raids through grandma's jewellery box, a graduation where I ate way too many lemon squares, floral spring dresses and an afternoon with the Debaters.  Lovely. 

I'm also trying to decide if I want bangs...completely unrelated, but that's what I was currently thinking about. 

Anyways, I hope you all have been up to lots of wonderful adventures! xo.

d.i.y. phone case.


My favourite part about summer is having free time for crafts.  So after a rather fun day full of breakfast at Cora's and a lovely afternoon at the park with my favourite children it was time to make something pretty.

I've been needing a case for my iphone pretty much since the day I got it. But I didn't want an ugly one, so instead I just freaked out every time my keys came within four inches of my phone screen. Yeah.

Then I found this one on Design Sponge.  Simple and perfect and I actually had everything at home.

Actually that's a lie.  I didn't have any of these supplies at home accept for the phone.  But I did have vinyl, a rotary cutter and a sewing machine.

Instead of using leather and hand-stitching/gluing the case together I cut out the pattern in vinyl and stitched the edges with my machine, and then hand-stitched the centre and it worked perfectly.  Before I stitched the pieces together I decided it needed something more and stitched some fun stripes on the back!


And then I decided I needed another one. 

I think this stems from the fact that I had just been at the park all day and I NEEDED to have my phone with me and I was wearing a dress and I didn't have any pockets and I didn't want to bring my bag because going to the park is supposed to be carefree/on a whim without enormous purses and so I just freaked out that my phone was going to fall out of my one very small pocket while I was on the swings.

Clearly the answer to all of this was to make a phone case that was really a tiny purse.  And then put fringe on it because I secretly love fringe but don't actually own anything with fringe because I don't really know how to wear it appropriately...


And now I can take my phone/credit card/lipgloss/crucial life elements everywhere...even when frantically chasing six year olds.  Beautiful. I sound like a mom.


There isn't really any instructions for this d.i.y except it's fun to realize that you can make something your own/more functional by adding some fringe/straps/stripes.  With the second one I just cut out a triangle the same size as the open flap and then "fringed" it with a rotary cutter and sewed along the top through all layers - just don't sew through the side tabs!  The 1/2" strap is just sewn to the back and back-stitched like crazy because I had visions of the strap coming loose and my phone crashing the ground.  Paranoid.  Completely.

Anyways, this week off has been absolutely lovely and full of wonderful adventures.  Including a graduation dinner.  I can't believe I'm really done.  It smells like flowers outside.  Go outside.  Right now. xo.

Ps. did you notice I'm wearing pants? Literally the first time I've worn jeans since January. It's weird.